Wazuh SIEM Deployment on Google Cloud Platform (1)
Hosted a Wazuh SIEM deployed on GCP, with Windows/Linux endpoints forwarding logs to a central SIEM manager for SOC monitoring.

1. Executive Summary
The primary objective of this hands-on laboratory is to design, deploy, and operate a SIEM environment hosted on Google Cloud Platform (GCP). By integrating a centralized Wazuh SIEM server with endpoints (Windows & Linux), this project aims to simulate real-world Security Operations Centre (SOC) workflows, cloud infrastructure management, and proactive threat detection capabilities.
Below is the Wazuh environment we are going to set up today.
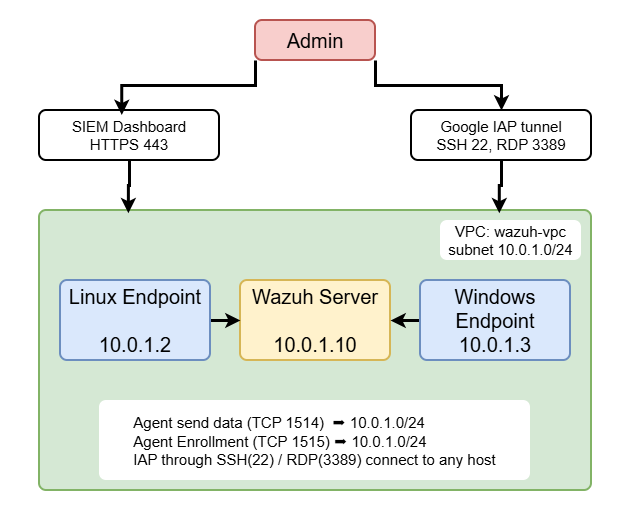
2. Configuration of the GCP
2.1. Google Cloud VPC Network Setup
| Item | Configuration |
|---|---|
| VPC Name | wazuh-vpc |
| Subnet Name | wazuh-subnet |
| Subnet Range | 10.0.1.0/24 |
2.2. Infrastructure Nodes
1. Wazuh Server
| Item | Configuration |
|---|---|
| VM Name | wazuh-server |
| Operating System | Ubuntu Server 22.04 LTS |
| Machine Type | e2-standard-4 (4 vCPU / 16 GB RAM) |
| Disk | 50 GB SSD |
| Internal IP (Static) | 10.0.1.10 |
| External IP (Static) | *** |
| Network Tag | wazuh-server |
| Wazuh Version | 4.14.6 (All-in-One: Indexer + Manager + Dashboard) |
2. Linux Endpoint
| Item | Configuration |
|---|---|
| VM Name | wazuh-endpoint-linux |
| Operating System | Ubuntu 22.04 LTS |
| Machine Type | e2-small (2 vCPU / 2 GB RAM) |
| Disk | 30 GB |
| Internal IP | 10.0.1.2 (DHCP) |
| External IP | None (Managed via IAP Tunnel) |
| Network Tag | wazuh-agent |
| Wazuh Agent Version | 4.14.6 |
| Target Manager IP | 10.0.1.10 |
3. Windows Endpoint
| Item | Configuration |
|---|---|
| VM Name | wazuh-endpoint-windows |
| Operating System | Windows Server 2022 Datacenter (Desktop Experience) |
| Machine Type | e2-medium (2 vCPU / 4 GB RAM) |
| Disk | 50 GB |
| Internal IP | 10.0.1.3 (DHCP) |
| External IP | None (Managed via IAP Tunnel) |
| Network Tag | wazuh-agent |
| Wazuh Agent Version | 4.14.1 |
| Target Manager IP | 10.0.1.10 |
2.3. Firewall Rules
2.3.1. Wazuh SIEM Server
| Direction | Target Tag | Source Range | Port / Protocol |
|---|---|---|---|
| Input | wazuh-server | 10.0.1.0/24 | TCP: 1514, 1515 |
This rule opens communication channels for endpoints to forward telemetry to the central Manager.
The source range
It is set to the entire subnet, rather than individual machines, to eliminate the need for manual firewall adjustments whenever a new machine is deployed.
Restricting Target Tag to wazuh-server
The Wazuh Manager is the sole node required to accept inbound agent connections. Endpoints function exclusively by initiating outbound traffic to report logs, eliminating the need to expose any incoming ports on the agents themselves.
TCP Port 1514 for Agent Communication, TCP Port 1515 for Agent Enrollment
2.3.2.allow-wazuh-dashboard
| Direction | Target Tag | Source Range | Port / Protocol |
|---|---|---|---|
| Input | wazuh-server | My_Public_IP/32 | tcp:443 |
It allows user to open the Wazuh Dashboard web interface (https://*) in browser to view alerts, search logs, and manage agents.
2.3.3.allow-wazuh-ssh
| Direction | Target Tag | Source Range | Port / Protocol |
|---|---|---|---|
| Input | wazuh-server | 35.235.240.0/20 (Google IAP Range) | tcp:22 |
It allows user to remotely log in to the server (to perform installation, configuration, debugging, and other operations) by using this command.
gcloud compute ssh wazuh-server --zone=... --tunnel-through-iapThis connection way first connects to Google’s IAP proxy server, which then forwards the connection to the VM. Therefore, regardless of the devices or ip addresses, user don’t need to update this rule when they change the login method.
2.3.4.allow-ssh-agents-iap
| Direction | Target Tag | Source Range | Port / Protocol |
|---|---|---|---|
| Input | wazuh-agent | 35.235.240.0/20(IAP) | tcp:22 |
The logic is the same as rule 3, except the target is changed to an endpoint machine (Linux endpoint), allowing user to log in to wazuh-endpoint-linux using the same IAP tunnel method for installation and debugging.
2.3.5.allow-rdp-iap
| Direction | Target Tag | Source Range | Port / Protocol |
|---|---|---|---|
| Input | wazuh-agent | 35.235.240.0/20(IAP) | tcp:3389 |
It allows user to use “Remote Desktop Connection” to connect to the graphical desktop environment of the Windows endpoint via the IAP tunnel.
3. Wazuh SIEM
3.1 Infrastructure Nodes
Connect to Wazuh Server
gcloud compute ssh wazuh-server --zone=australia-southeast1-b --tunnel-through-iapConnect to Linux Node
gcloud compute ssh wazuh-endpoint-linux --zone=australia-southeast1-b --tunnel-through-iapConnect to Windows Node
- (RDP, need to connect on real pc, cannot through Cloud Shell to connect)
gcloud compute start-iap-tunnel wazuh-endpoint-windows 3389 --local-host-port=localhost:13389 --zone=australia-southeast1-b- And then, Use Remote Desktop Connection input localhost:13389
3.2 Installation process
I followed the Wazuh Quickstart to install.
3.2.1. Wazuh SIEM Server
- Connect to the server (via IAP tunnel)
gcloud compute ssh wazuh-server \
--zone=australia-southeast1-b \
--tunnel-through-iap- Update system packages
sudo apt update- Download and run the Wazuh installation assistant
curl -sO https://packages.wazuh.com/4.14/wazuh-install.sh && sudo bash ./wazuh-install.sh -a- Wait for the output shows the access credentials and a message that confirms that the installation was successful
INFO: --- Summary ---
INFO: You can access the web interface https://<WAZUH_DASHBOARD_IP_ADDRESS>

	User: admin
	Password: <ADMIN_PASSWORD>
INFO: Installation finished.-
Access the password on Wazuh web interface
-
Login Successfully
3.2.2. Deploy new agent(Linux)
I followed the Deploying Wazuh agents on Linux endpoints to install the Wazuh agents on Windows.
- Connect to the server (via IAP tunnel)
gcloud compute ssh wazuh-endpoint-linux \
  --zone=australia-southeast1-b \
--tunnel-through-iap- Install necessary packages
gnupgTo ensure the downloaded package has not been tampered.apt-transport-httpsAllows apt to access package libraries via the HTTPS protocol.
apt-get install gnupg apt-transport-https- Import the Wazuh GPG key
curl -s https://packages.wazuh.com/key/GPG-KEY-WAZUH | gpg --no-default-keyring --keyring gnupg-ring:/usr/share/keyrings/wazuh.gpg --import && chmod 644 /usr/share/keyrings/wazuh.gpg- Add the Wazuh repository
- Adds a
.listfile telling apt where to fetch Wazuh packages from.
echo "deb [signed-by=/usr/share/keyrings/wazuh.gpg] https://packages.wazuh.com/4.x/apt/ stable main" | tee -a /etc/apt/sources.list.d/wazuh.list- Update package
apt-get update- Install and specify the Manager IP
WAZUH_MANAGER="10.0.1.10" apt-get install wazuh-agent- Enable and start the service
systemctl daemon-reload
systemctl enable wazuh-agent
systemctl start wazuh-agentdaemon-reload: reloads systemd unit filesenable: configures the service to start.
start: starts the agent service.
- Lock the package to prevent auto-updates
sed -i "s/^deb /#deb/" /etc/apt/sources.list.d/wazuh.list
apt-get update- Success! Confirm the new agent appears
3.2.3. Deploy new agent(Windows)
I followed the Deploying Wazuh agents on Windows endpoints to install the Wazuh agents on Windows.
- Generate the login password
gcloud compute reset-windows-password wazuh-endpoint-windows \
  --zone=australia-southeast1-b

password: *********
username: *********- Log in to Google Cloud via PowerShell
gcloud auth login- Configure and set the project
gcloud config set project siem-wazuh-*****- Start the IAP tunnel (forwards RDP port)
gcloud compute start-iap-tunnel wazuh-endpoint-windows 3389 `
  --local-host-port=localhost:13389 `
--zone=australia-southeast1-b- Uses IAP to remote VM’s port 3389 (RDP) to
localhost:13389on local machine.
- Connect via RDP
Computer: localhost:13389
UserName: ******
Password: ******- Open Windows’ “Remote Desktop Connection” and connect to
localhostport13389
- Download the Wazuh Agent installer
Invoke-WebRequest -Uri https://packages.wazuh.com/4.x/windows/wazuh-agent-4.14.1-1.msi -OutFile $env:tmp\wazuh-agent.msi- Confirm the download succeeded
Test-Path $env:tmp\wazuh-agent.msi- Install and specify the Manager IP
msiexec.exe /i .\wazuh-agent-4.14.6-1.msi /q WAZUH_MANAGER="10.0.1.10"- Confirm the service was created
Get-Service -Name WazuhSvc- Checks the Windows services list for
WazuhSvc, confirming the installation successfully.
- Restart the service
Start-Service -Name WazuhSvc
Get-Service -Name WazuhSvcStart-Servicestarts the serviceGet-Serviceconfirm the status has changed toRunning.
- Done! Confirm on the Dashboard
4. Conclusion
Although this was my first time using Google Cloud to install Wazuh on a VM, it was a great learning experience. I learned a lot about how to troubleshoot installation issues when they occur (mostly with the help of AI). Next time, if companies or organizations need to install Wazuh SIEM on their infrastructure, I can proudly say, “I’ve done that before! Leave it to me!”
Reference
Google. (n.d.). Google Cloud Platform. https://cloud.google.com/
Wazuh, Inc. (n.d.). Quickstart. Wazuh Documentation. https://documentation.wazuh.com/current/quickstart.html
Wazuh, Inc. (n.d.). Wazuh agent package installation for Linux. Wazuh Documentation. https://documentation.wazuh.com/current/installation-guide/wazuh-agent/wazuh-agent-package-linux.html
Wazuh, Inc. (n.d.). Wazuh agent package installation for Windows. Wazuh Documentation. https://documentation.wazuh.com/current/installation-guide/wazuh-agent/wazuh-agent-package-windows.html